완성 화면
완성한 기능의 화면 일부이다.


기본 타이머를 사용을 하면서 한 번쯤 타이머를 만들어 보고 싶었다. 타이머 기능 외에도 부가적인 기능을 추가하느라 조금 시간이 걸렸지만 기본적인 기능은 완성이 된 상태이다.
타이머 자체를 구현하는 것은 간단한 일이었다.
타이머를 위한 시간을 설정하는 부분에서는 numberPicker를 사용하였고 start 버튼을 누르면 텍스트뷰를 1초마다 변경해 주도록 하면 된다. 그다음 시분초의 값 모두가 0이 되면 타이머가 종료되도록 하였다.
이 글에서는 타이머를 시작하고 종료하는 부분만 언급한다.
개인적으로 진행중이 타이머 앱의 일부 기능을 작성.
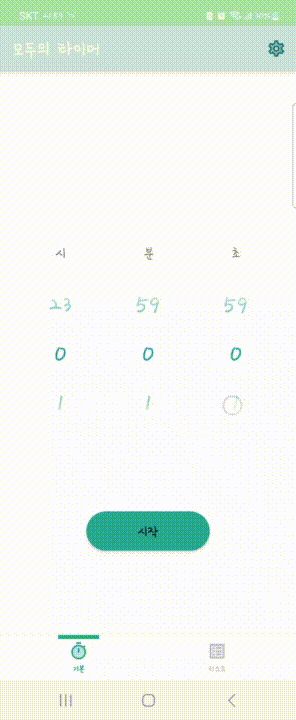
1. 타이머 시간 설정 화면(xml)

xml에 numberPicker와 시작 버튼을 추가해 준다. 데이터바인딩을 사용해 주기 위해 <data> 추가해 주었다.
처음의 textView는 numberPIcker 위에 있는 글자 hour, minute, sec를 위한 부분이다.
아래의 코드를 사용하면 왼쪽의 화면을 만들 수 있다.
<?xml version="1.0" encoding="utf-8"?>
<layout
    xmlns:android="http://schemas.android.com/apk/res/android"
    xmlns:app="http://schemas.android.com/apk/res-auto"
    xmlns:tools="http://schemas.android.com/tools">

    <data>
        <variable
            name="timer"
            type="(package).TIMER" />
    </data>

    <FrameLayout
        android:layout_width="match_parent"
        android:layout_height="match_parent"
        tools:context=".BasicTimerFragment"
        android:animateLayoutChanges="true"
        >
        ....

        <androidx.constraintlayout.widget.ConstraintLayout
            android:id="@+id/stopLayout"
            android:layout_width="match_parent"
            android:layout_height="match_parent"
            android:clipToPadding="false"
            android:padding="10dp">

            <LinearLayout
                android:id="@+id/linearLayout"
                android:layout_width="match_parent"
                android:layout_height="wrap_content"
                android:orientation="horizontal"
                android:padding="10dp"
                app:layout_constraintBottom_toTopOf="@+id/linearLayout2"
                app:layout_constraintEnd_toEndOf="parent"
                app:layout_constraintStart_toStartOf="parent">

                <TextView
                    android:id="@+id/textView"
                    android:layout_width="wrap_content"
                    android:layout_height="wrap_content"
                    android:layout_weight="1"
                    android:gravity="center"
                    android:text="@string/hour"
                    android:textSize="15sp" />

                <TextView
                    android:id="@+id/textView3"
                    android:layout_width="wrap_content"
                    android:layout_height="wrap_content"
                    android:layout_weight="1"
                    android:gravity="center"
                    android:text="@string/minute"
                    android:textSize="15sp" />

                <TextView
                    android:id="@+id/textView2"
                    android:layout_width="wrap_content"
                    android:layout_height="wrap_content"
                    android:layout_weight="1"
                    android:gravity="center"
                    android:text="@string/sec"
                    android:textSize="15sp" />
            </LinearLayout>

            <LinearLayout
                android:id="@+id/linearLayout2"
                android:layout_width="match_parent"
                android:layout_height="wrap_content"
                android:orientation="horizontal"
                android:padding="10dp"
                app:layout_constraintBottom_toBottomOf="parent"
                app:layout_constraintEnd_toEndOf="parent"
                app:layout_constraintStart_toStartOf="parent"
                app:layout_constraintTop_toTopOf="parent">

                <NumberPicker
                    android:id="@+id/numberPicker1"
                    android:layout_width="wrap_content"
                    android:layout_height="wrap_content"
                    android:layout_weight="1"
                    android:gravity="center"
                    android:selectionDividerHeight="0dp"
                    android:theme="@style/numverPickerStyle" />

                <NumberPicker
                    android:id="@+id/numberPicker2"
                    android:layout_width="wrap_content"
                    android:layout_height="wrap_content"
                    android:layout_weight="1"
                    android:gravity="center"
                    android:selectionDividerHeight="0dp"
                    android:theme="@style/numverPickerStyle" />

                <NumberPicker
                    android:id="@+id/numberPicker3"
                    android:layout_width="wrap_content"
                    android:layout_height="wrap_content"
                    android:layout_weight="1"
                    android:gravity="center"
                    android:selectionDividerHeight="0dp"
                    android:theme="@style/numverPickerStyle" />
            </LinearLayout>

            <androidx.appcompat.widget.AppCompatButton
                android:id="@+id/startButton"
                android:layout_width="150dp"
                android:layout_height="wrap_content"
                android:background="@drawable/button_pressed_selector"
                android:elevation="10dp"
                android:padding="10dp"
                android:text="@string/start"
                android:textColor="@color/black"
                app:layout_constraintBottom_toBottomOf="parent"
                app:layout_constraintEnd_toEndOf="parent"
                app:layout_constraintStart_toStartOf="parent"
                app:layout_constraintTop_toBottomOf="@+id/linearLayout2" />
        </androidx.constraintlayout.widget.ConstraintLayout>
    </FrameLayout>
</layout>

그 다음은 타이머가 시작 버튼을 눌렀을 때의 화면이다.
이 부분에서 시간을 나타내는 부분을 하나의 텍스트뷰를 사용해서 사용해도 되지만 나는 세 개로 사용하였다.
하나로 사용할 것이라면 string.format 을 사용해서 "%02d:%02d:%02d", 해도 된다. 나는 각 부분을 % 02d로 사용해 주었다.
<string name="number" translatable="false">%02d</string>
<androidx.constraintlayout.widget.ConstraintLayout
            android:id="@+id/TimerLayout"
            android:layout_width="match_parent"
            android:layout_height="match_parent"
            android:padding="10dp"
            android:visibility="invisible">

            <LinearLayout
                android:id="@+id/linearLayout_2"
                android:layout_width="match_parent"
                android:layout_height="wrap_content"
                android:layout_marginHorizontal="20dp"
                android:orientation="horizontal"
                android:padding="10dp"
                app:layout_constraintBottom_toBottomOf="parent"
                app:layout_constraintEnd_toEndOf="parent"
                app:layout_constraintStart_toStartOf="parent"
                app:layout_constraintTop_toTopOf="parent">

                <TextView
                    android:id="@+id/hourTv"
                    android:layout_width="0dp"
                    android:layout_height="wrap_content"
                    android:layout_weight="1"
                    android:gravity="center"
                    android:text="@{@string/number(timer.hour)}"
                    android:textStyle="bold"
                    android:theme="@style/numverPickerStyle" />

                <TextView
                    android:id="@+id/colon1"
                    android:layout_width="0dp"
                    android:layout_height="wrap_content"
                    android:layout_weight="1"
                    android:gravity="center"
                    android:text="@string/colon"
                    android:textStyle="bold"
                    android:theme="@style/numverPickerStyle" />

                <TextView
                    android:id="@+id/minTv"
                    android:layout_width="0dp"
                    android:layout_height="wrap_content"
                    android:layout_weight="1"
                    android:gravity="center"
                    android:text="@{@string/number(timer.min)}"
                    android:textStyle="bold"
                    android:theme="@style/numverPickerStyle" />

                <TextView
                    android:id="@+id/colon2"
                    android:layout_width="0dp"
                    android:layout_height="wrap_content"
                    android:layout_weight="1"
                    android:gravity="center"
                    android:text="@string/colon"
                    android:textStyle="bold"
                    android:theme="@style/numverPickerStyle" />

                <TextView
                    android:id="@+id/secTv"
                    android:layout_width="0dp"
                    android:layout_height="wrap_content"
                    android:layout_weight="1"
                    android:gravity="center"
                    android:text="@{@string/number(timer.sec)}"
                    android:textStyle="bold"
                    android:theme="@style/numverPickerStyle" />


            </LinearLayout>

            <LinearLayout
                android:layout_width="match_parent"
                android:layout_height="wrap_content"
                android:layout_marginHorizontal="20dp"
                app:layout_constraintBottom_toBottomOf="parent"
                app:layout_constraintEnd_toEndOf="parent"
                app:layout_constraintStart_toStartOf="parent"
                app:layout_constraintTop_toBottomOf="@+id/linearLayout_2">

                <androidx.appcompat.widget.AppCompatButton
                    android:id="@+id/pauseButton"
                    android:layout_width="match_parent"
                    android:layout_height="wrap_content"
                    android:layout_marginHorizontal="10dp"
                    android:layout_weight="1"
                    android:background="@drawable/pause_button_pressed_selector"
                    android:padding="10dp"
                    android:text="@string/pause"
                    android:textColor="@color/black" />

                <androidx.appcompat.widget.AppCompatButton
                    android:id="@+id/cancelButton"
                    android:layout_width="match_parent"
                    android:layout_height="wrap_content"
                    android:layout_marginHorizontal="10dp"
                    android:layout_weight="1"
                    android:background="@drawable/button_pressed_selector"
                    android:padding="10dp"
                    android:text="@string/cancel"
                    android:textColor="@color/black" />

            </LinearLayout>

        </androidx.constraintlayout.widget.ConstraintLayout>
2. numberPicker설정 코드(java)
numberPicker를 사용하기 위해서는 해당 피커의 min/max값을 지정해 주어야한다. 최솟값은 0으로 최댓값은 23과 59로 시분초에 맞는 값을 정해주는 코드가 필요하다.
(이 부분은 타이머앱을 자바로 다시 수정해서 만들까 고민하다가 코틀린으로 그냥 진행해서 유일하게 남아있는 자바코드이다. 코틀린으로 수정하기에 크게 어렵지 않은 부분이라 그냥 자바로 작성해 둔다.)
import android.widget.NumberPicker;

public class SetNumberPicker{

    NumberPicker picker1, picker2,picker3;
    int hour,min,sec;

    SetNumberPicker(NumberPicker _picker1,NumberPicker _picker2,NumberPicker _picker3,int H, int M,int S){
        picker1 = _picker1;
        picker2 = _picker2;
        picker3 = _picker3;
        hour = H;
        min = M;
        sec = S;
    }

    public int getHour() {
        return hour;
    }

    public int getMin() {
        return min;
    }

    public int getSec() {
        return sec;
    }

    public void setting(){
        picker1.setMaxValue(23);
        picker2.setMaxValue(59);
        picker3.setMaxValue(59);

        picker1.setMinValue(0);
        picker2.setMinValue(0);
        picker3.setMinValue(0);

        picker1.setValue(hour);
        picker2.setValue(min);
        picker3.setValue(sec);

        picker1.setWrapSelectorWheel(true);
        picker2.setWrapSelectorWheel(true);
        picker3.setWrapSelectorWheel(true);

        picker1.setOnValueChangedListener((picker, oldVal, newVal) -> hour = newVal);
        picker2.setOnValueChangedListener((picker, oldVal, newVal) -> min = newVal);
        picker3.setOnValueChangedListener((picker, oldVal, newVal) -> sec = newVal);
    }

}
이 코드가 내가 만든 타이머 앱에서 데이터를 가져와서 그 데이터를 numberPicker에 보여주어야 하는 부분이 있어서 생성자에 numberPicker 말고 시분초 값을 가져와서 세팅해 주는 부분이 있는데 이 부분이 필요 없다면 지워주어도 된다.
필요 없는 부분에서 numberPicker를 설정하기 위한 클래스를 호출해서 사용해 줄 때 시분초에 0의 매개변수를 넘겨주어 사용하도록 했다.
numberPicker가 시분초 각 3개 이기 때문에 세개 모두 각각의 설정을 해주었다.
setMaxValue는 해당 numberPicker의 최대값을 지정하는 메서드이고,
setMinValue는 해당 numberPicker의 최소값을 지정하는 메서드이다.
setValue는 해당 numberPicker의 현재 값을 지정하는 메서드이다.
setWrapSelectorWheel는 numberPicker가 돌아갈 때 최대값이 되었을 때 그다음 값이 최솟값이 되거나 최솟값 다음 수가 최댓값이 되도록 하는지 설정해 주는 메서드이다. 그냥 쉽게 말해 설정한 수의 범위 내에서 계속 삥삥 돌아가게 할 것인지 말건지를 설정해 주는 것이다.
setOnValueChangedListener은 값이 변했을 때의 리스너인데 타이머 시간을 설정 할 때는 그 값이 어떤 값인지만 저장하면 되는 거라 변수에 변한 값을 저장해 주는 것으로 간단히 코드를 작성하였다.
3. Activity()
앞에서 작성한 코드를 활용하기 위한 마지막 부분이다.
나는 fragment를 사용한 코드라 시작 버튼을 눌렀을 때 타이머 시작 액티비티로 이동하지 않는다.
(시작 버튼을 누르면 fragment 가 변하는 것으로 코드를 작성했는데, 개인적으로 아쉬운 부분이다. 더 깔끔하게 코드를 작성하는 방법을 공부하는 중이다.)
기존에 작성해 두었던 SetNumberPicker클래스를 사용하여 numberPicker를 세팅해주고 시작버튼의 리스너를 추가해 준다.
 numberPicker = SetNumberPicker(binding.numberPicker1,binding.numberPicker2,binding.numberPicker3,0,0,0)
 numberPicker.setting()
 binding.startButton.setOnClickListener { startButtonClick() }
시작 버튼을 누르면 아래 함수가 호출된다.
private fun startButtonClick() {
        var hour  = numberPicker.getHour()
        var min  = numberPicker.getMin()
        var sec  = numberPicker.getSec()
		...
        if (hour != 0 || min != 0 || sec != 0) {
            binding.timer =TIMER(hour,min,sec)
            tmpH = hour
            tmpM = min
            tmpS = sec
            startTimer()
        }
    }
SetNumberPicker의 getter를 사용하여 numberPicker의 설정값을 가지고 와서 변수에 저장해주고 모든 수의 값이 0이 아니라면 타이머를 시작하는 함수를 호출하도록 하였다.
위의 binding.timer =TIMER(hour,min,sec)는 위에서 언급했던 타이머 진행되는 화면의 텍스트뷰에 설정한 numberPicker의 값을 넣어 보여주기 위한 부분이다.
그리고 아래는 타이머가 진행되는 부분의 코드이다.
 private fun startTimer() {
        timer?.cancel()

        startCont() //시작 카운트 다운 함수

       timer = timer(period = 1000, initialDelay = 3200) {
            if (tmpS != 0) {// 0초 아니면
                tmpS--
            } else if (tmpM != 0) {// 0분 아니면
                tmpS = 59
                tmpM--
            } else if (tmpH != 0) {// 0시간 아니면
                tmpS = 59
                tmpM = 59
                tmpH--
            }

            activity?.runOnUiThread{
                binding.timer = TIMER(tmpH,tmpM,tmpS)
                // 시분초가 다 0이
                if(tmpH == 0 && tmpM == 0 && tmpS == 0) {
                    timer?.cancel()
                    val vloop = longArrayOf(600,300)//600진동 300 대기
//                    vibrator.vibrate(VibrationEffect.createOneShot(1000,50))
                    vibrator.vibrate(vloop, 0) //계속 진동
                    ringtone.play()
                    binding.cancelButton.text=resources.getString(R.string.done)
                }
            }
        }

    }
timer?.cancel() 는 이전에 이미 진행하고 있는 타이머가 있을 수 있는 것을 대비해서 넣어둔 코드이다.
startCont() 함수는 이 글에서는 다루지 않는 부분인데 타이머가 시작하기 전에 카운트다운해 주기 위한 코드이므로 무시해도 좋다.
timer(period = 1000, initialDelay = 3200)는 1초마다 반복하는 타이머로 3200 지연 후 시작하는 타이머이다.
위 부분에서 1초마다 아래 코드를 통해 현재 시간을 검증하여 1초씩 줄어들 수 있도록 값을 줄여주도록 해준다.
if (tmpS != 0) {// 0초 아니면
	tmpS--
} else if (tmpM != 0) {// 0분 아니면
	tmpS = 59
   	tmpM--
} else if (tmpH != 0) {// 0시간 아니면
	tmpS = 59
   	tmpM = 59
   	tmpH--
}
예를 들어 0:2:0으로 2분의 타이머를 설정하여 시작하였다면 초부터 검증을 하는데,
초가 0이 아닌 수라면 1초를 줄여야 하기때문에 초--를 해주고
초가 0일 때는 분을 1 줄이고 초를 59로하여 다시 1씩 줄여야 하기 때문에 tmpS = 59, tmpM--를 해주는 것이다.
그 다음으로 초와 분 모두 0이라면 시를 줄여야 하기 때문에 시를 -1해 주고 분과 초를 59로 만들어 주는 것이다.
이 코드를 1초마다 진행하면서 모두 0이 되면 이 글에서 보여주지는 않았지만 진동과 벨이 울리도록 한 코드가 있는데, 지동과 벨이 작동하도록 하였다.
그리고 카운트 다운이 완성되면 화면에 종료 버튼을 누르면 타이머와 진동, 벨이 종료되도록 하였다.
 timer?.let {
            binding.TimerLayout.visibility = View.INVISIBLE
            binding.stopLayout.visibility = View.VISIBLE
            it.cancel()
        }
        vibrator.cancel()
        ringtone.stop()
🎉완성 작동 화면
'안드로이드 앱 개발 공부 > 자꾸 까먹어서 적어두는 구현방법' 카테고리의 다른 글
| [Android] viewpager 간단하게 indicator 만들기 JAVA (0) | 2024.10.01 |
|---|---|
| [Android] 버튼+ 홈 키 사용해서 비디오 pip 구현 _ kotlin 코틀린 (2) | 2023.10.16 |
| [안드로이드] 데이터바인딩 databinding 기본 코틀린 (0) | 2023.08.17 |
| [안드로이드] string.xml을 통해 다국어 설정 (0) | 2023.08.07 |
| [안드로이드] intent를 사용한 Activity 전환 Kotlin 코틀린 (0) | 2023.08.06 |

댓글